Starting a bathroom renovation begins long before the first wall is torn down. Clearing the space of personal items and removing smaller fixtures is essential. Doors, mirrors, and decorations should be set aside or safely stored. Plumbing and electrical lines must be identified to prevent accidental damage during the demolition. Taking photographs and making notes of existing layouts can save time later when reconstructing the new design. Protecting flooring and adjacent rooms from dust and debris ensures a cleaner and safer workspace. Planning your demolition step by step reduces surprises and creates a smoother workflow. Knowing what materials to remove first, whether tiles, cabinets, or bathtubs, can streamline the process. It’s about thinking ahead and preparing for the unexpected, so the renovation unfolds with minimal disruptions.
Understanding the scope of your demolition allows you to anticipate potential hazards. Wet walls, fragile tiles, or mold can require special handling. Using proper safety gear and tools is crucial to avoid injury. Removing larger fixtures first provides easier access to walls and flooring. Efficiently disposing of debris as it accumulates maintains organization. Scheduling dumpster pickup or junk removal in advance prevents clutter from slowing the project. A methodical approach ensures every step leads logically to the next, making the renovation process feel controlled rather than chaotic. By investing time in preparation, your bathroom demolition sets a strong foundation for the transformation ahead.
Choosing the Right Tools for Demolition
The right tools can make or break a bathroom demolition. Hammers, pry bars, sledgehammers, and utility knives are essential for removing cabinets, tiles, and drywall. Power tools like reciprocating saws or drills can expedite tougher tasks while reducing strain on your body. However, using the wrong tool for a delicate job can damage surrounding areas or compromise safety. Selecting quality, durable tools ensures the work progresses smoothly. Organizing tools in advance keeps the workflow uninterrupted, allowing you to focus on the task rather than searching for equipment mid-project. Considering ergonomics and proper technique reduces fatigue and enhances precision, making the demolition safer and faster.
Tools are only as effective as the approach behind them. Applying the right amount of force, using protective gear, and pacing the work are critical for avoiding accidents. Tiling removal requires patience and careful leverage, whereas fixtures like sinks or toilets may demand more brute force. Ensuring that power tools are handled by someone familiar with their operation prevents mishaps. Having a systematic order of operations paired with the right equipment translates to efficiency. It’s about combining skill with proper tools to maintain control, limit damage, and keep the demolition on track.
Managing Dust and Debris During Demolition
Dust and debris can quickly overwhelm a renovation if not managed properly. Covering vents, doorways, and surfaces with plastic sheeting helps contain particles within the demolition area. Wetting surfaces lightly during tile removal can reduce airborne dust. Wearing protective gear like masks and goggles safeguards health while handling materials. Establishing a dedicated debris collection spot allows you to remove waste efficiently without spreading it throughout the home. A daily cleanup routine ensures the workspace remains navigable and safe, preventing injuries and mishaps caused by hidden hazards.
Debris management is more than containment; it’s about planning disposal. Heavy items, broken tiles, and old fixtures require proper handling to avoid damage or strain. Coordinating with local junk removal services or scheduling dumpster pickups ensures waste doesn’t accumulate. Segregating materials by recyclables, hazardous waste, and general debris streamlines removal. A cleaner workspace fosters a safer environment, reduces stress, and keeps the project moving efficiently. Controlling dust and debris maintains the pace and quality of your bathroom renovation.
Safely Removing Plumbing Fixtures
Plumbing fixtures such as sinks, toilets, and bathtubs require careful removal. Shutting off water supply lines prevents leaks and flooding. Disconnecting plumbing connections methodically reduces the risk of damage. Removing fixtures in reverse installation order often makes extraction smoother. Some fixtures may be heavy or awkward, necessitating two people for safe handling. Labeling pipes and fittings ensures easier reinstallation later. Proper technique minimizes damage to surrounding walls or floors, preserving surfaces for the next phase of renovation.
In addition to safety, disposing of plumbing fixtures responsibly is important. Many old items can be recycled or donated if in good condition. Coordinating with junk removal services or using a designated collection container prevents clutter and streamlines the renovation. Understanding the plumbing layout beforehand prevents unnecessary disruptions and mistakes. With careful planning, removing plumbing fixtures becomes a manageable step rather than a chaotic or risky task, setting the stage for a seamless renovation.
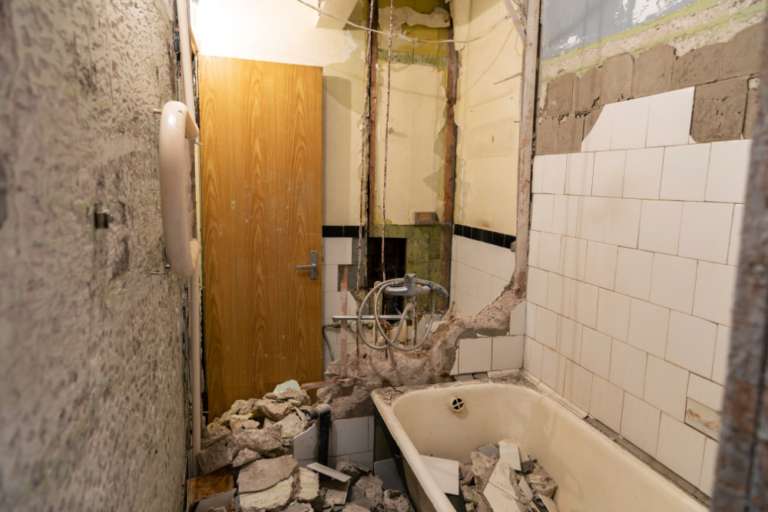
Demolishing Tiles and Flooring Efficiently
Tile and flooring removal is often one of the most labor-intensive aspects of a bathroom demolition. Starting with edges and corners can create leverage for easier removal. Using chisels, pry bars, or power tools accelerates the process while reducing strain. Patience is essential to avoid damaging subfloors that must remain intact for new installations. Planning the removal sequence logically keeps debris organized and maintains workspace safety. Removing old adhesive and grout ensures a smooth surface for fresh tiles or flooring.
Attention to detail during this stage affects the final outcome. Damaging subfloors or walls can increase renovation costs and delays. Efficient debris handling, proper disposal, and keeping tools accessible enhance productivity. Breaking tiles carefully, wearing protective gear, and controlling dust all contribute to a safer work environment. Systematic removal allows for better evaluation of surfaces, making it easier to address hidden issues like mold or water damage before laying new materials. Efficient demolition preserves integrity and prepares the bathroom for a fresh, long-lasting finish.
Handling Walls and Drywall
Walls and drywall often conceal plumbing, electrical, and structural elements that require careful consideration. Removing drywall in manageable sections helps control dust and debris while preventing damage to framing or pipes. Cutting along seams and using the right tools ensures precise removal. Being aware of hidden wires or plumbing lines prevents accidents and costly repairs. Removing wallpaper, tiles, or paneling first allows smoother demolition without affecting structural integrity.
After the walls are down, inspecting for damage or hidden issues is critical. Mold, rot, or faulty wiring discovered during demolition can be addressed immediately. Efficient disposal of drywall debris prevents clutter and safety hazards. Maintaining a clean and organized workspace aids in transitioning to the next renovation steps. Proper handling of walls ensures both safety and the quality of the bathroom transformation, laying the groundwork for a beautiful and functional space.
Addressing Structural Challenges
Some bathroom renovations uncover unexpected structural challenges. Water damage, weak subfloors, or outdated framing may require reinforcement or repairs. Identifying these issues early prevents setbacks and costly fixes later. Consulting with professionals ensures structural adjustments comply with building codes. Strengthening frameworks before installing new fixtures or finishes creates a safer, longer-lasting renovation outcome.
Structural challenges also influence design choices. Adjusting layouts, selecting appropriate materials, or adding support can affect the overall aesthetic and function. Proper assessment and reinforcement maintain safety while enhancing durability. Tackling these obstacles during demolition rather than later ensures a smoother workflow. By addressing structural concerns proactively, the renovation remains on schedule, and the bathroom becomes a resilient, well-designed space.
Planning for Electrical and Lighting Updates
Demolition often reveals opportunities to upgrade electrical systems and lighting. Old wiring may be insufficient for modern fixtures or lighting schemes. Identifying electrical paths and safely disconnecting circuits is crucial before removing walls or cabinets. Planning for lighting updates during demolition simplifies installation and ensures compliance with safety standards. Strategic placement of outlets and switches can enhance convenience and functionality in the renovated bathroom.
Updating electrical elements during demolition reduces future work and expenses. Coordinating with licensed electricians ensures compliance with building codes. Removing outdated fixtures allows for new energy-efficient lighting solutions and improved aesthetics. Proper planning at this stage creates a more adaptable and modern bathroom environment. Combining demolition with electrical updates enhances both safety and convenience, setting the stage for a contemporary, functional space.
Efficient Debris Disposal and Junk Removal
Debris disposal is a vital part of any bathroom renovation. Removing old tiles, cabinets, and fixtures creates a safer and more organized environment. Coordinating junk removal services or arranging for dumpsters allows continuous progress without obstruction. Sorting materials by recyclables, hazardous items, and general waste simplifies disposal. Keeping the workspace clean promotes efficiency and reduces stress during the renovation.
Timely removal of debris ensures the project stays on track. Working with professional junk removal teams minimizes physical strain and ensures proper handling of waste. Organizing debris in advance, using containers or tarps, and scheduling pickups maintains momentum. Effective debris management not only protects your home but also supports a smoother, safer, and more productive renovation experience. Reliable junk removal contributes significantly to achieving a polished, clutter-free result.
Preparing for New Installations
Once demolition is complete, preparing the bathroom for new installations is crucial. Cleaning surfaces, inspecting for damage, and leveling floors create a solid foundation. Marking areas for fixtures, plumbing, and electrical components ensures accuracy during installation. Anticipating challenges and confirming measurements reduces the risk of mistakes. Proper preparation facilitates a smoother installation process and a professional-looking outcome.
Attention to detail at this stage maximizes efficiency. Ensuring walls and floors are ready for cabinets, tiles, and plumbing prevents delays. Organizing tools, materials, and layouts streamlines workflow. This preparation bridges demolition and installation seamlessly, allowing the renovation to proceed without unnecessary interruptions. Thoughtful preparation lays the groundwork for a beautiful, functional bathroom tailored to your vision.
Conclusion
Completing a bathroom demolition requires careful planning, methodical execution, and efficient debris management. From clearing fixtures to handling walls and flooring, every step contributes to a smoother renovation experience. Coordinating junk removal services simplifies cleanup, reduces clutter, and keeps the project on schedule. Attention to safety, preparation, and organization ensures the process unfolds with minimal stress, allowing your vision to take shape efficiently.
For professional assistance with debris and fixture removal during renovations, North Bay Junk Removal in Santa Rosa CA provides comprehensive solutions. Their team handles everything from heavy demolition debris to everyday items, ensuring your renovation space is clean and ready for the next phase. Contact North Bay Junk Removal at 707-478-6817 for reliable junk removal services that make your bathroom transformation seamless and hassle-free.